RiffTrax is a project by the actors behind MST3K. While they specialize in Sci-Fi B-Movies, they also offer “Just the Jokes": riff tracks that play over traditional Hollywood movies you’ve seen before.
The tracks are traditionally played on a secondary device - you’re watching the movie and playing the provided MP3 file via some other means and doing your best to keep the two in sync with the provided sound cues. This is inelegant, and if you have a collection of ripped media files you’ll likely wish for a way to integrate the sound into the video files directly. I’ve read a number of guides on this process. They each offered some useful guidance, but I found them all missing various pieces. Special thanks to Rudis Muiznieks who came the closest to what I want and whose guide formed the core of my process.
Requirements
- Work with MKV containers
- Adding the Rifftrax track completely separately so that the original audio track was present in the same file
- Preserving surround sound audio for the movie - This is the step that most of the other guides miss
- Eliminating the robot voice used to synchronize the RiffTrax with the original audio
- Avoid having to re-encode the video content
My Process
Prerequisites
This guide will use a sox, ffmpeg, mkvtoolnix, and Audacity. These tools are available for all major platforms. This guide will be written assuming a Linux environment. If you are on Windows, it will work well in the Windows Subsystem for Linux, although you may find it easiest to install the Windows mkvtoolnix as well for its GUI interface (as well as using the native version of Audacity). If running the Windows version of other tools, note that the released version of sox does not include support for MP3 files and you will need to compile your own version or transcode any MP3 files to another format such as WAV.
To install the necessary tools:
sudo apt install mkvtoolnix ffmpeg sox lame libsox-fmt-mp3 audacity
Rip the movie
To start, you will need a ripped version of your movie, optionally compressed to save space. There are a number of tools and guides for this process. Keeping in mind the copyright and encryption laws in your nation, you should select your best option.
If an AC3 audio track is available, including it in the rip will save some steps. Otherwise you will have to extract and transcode any DTS tracks to AC3.
Extract the audio file
You can see all of the audio and video tracks in your file:
mkvinfo Movie.mkv
This will produce output like the following. We’re particularly interested in the track ID for mkvmerge & mkvextract and Codec ID.
| + A track
|  + Track number: 2 (track ID for mkvmerge & mkvextract: 1)
|  + Track UID: 32417
|  + Track type: audio
|  + Lacing flag: 0
|  + Codec ID: A_AC3
With the track number, you can extract the audio from the file:
mkvextract Movie.mkv tracks 1:Movie.ac3
1 is the track ID for mkvmerge & mkvextract obtained above. This will extract the audio to a file named Movie.ac3. If the codec is A_DTS instead of A_AC3, you should name your file with an extension ending in .dts rather than .ac3.
Working with DTS-HD audio
The tools are unable to work with DTS-HD master audio. If this is a DTS-HD Master track, you’ll need to begin by extracting the DTS core stream from the master stream:
ffmpeg -i MovieDTSHD.dts -bsf:a dca_core -c:a copy Movie.dts
Prepare a clean version of the RiffTrax audio file
The Rifftrax audio comes with guidance on how to synchronize it to the movie. This is unnecessary and distrating in a combined audio file. Open the rifftrax MP3 file in Audacity. Go to each timestamp mentioned in the Rifftrax README file in the “DISEMBAUDIO SYNCH LINES” section (this is different from the “TIMECODE SYNCH” section) and listen to the audio nearby to find the robot voice saying a line from the movie. Note that the timestamps can be unreliable in some movies, so be sure to look a few seconds before or after if you don’t find it at the exact position mentioned.
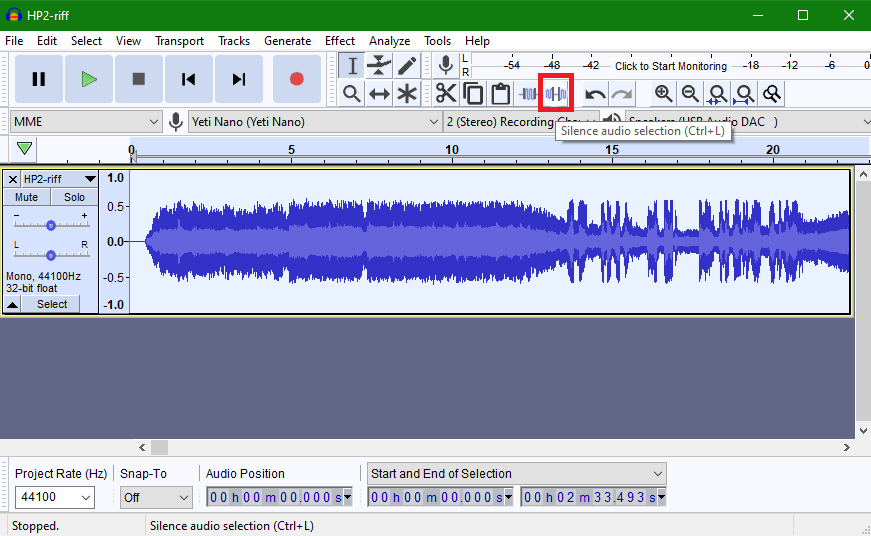
When you find the robot voice, select that region of audio and hit the silence button (or press Ctrl+L):

After doing this for each of the robot voice segments, you can also silence all of the instructions for synchronization, ending with a countdown. The end of this introduction is usually the first timestamp in the “TIMECODE SYNCH” section of the README file. Silence all of this intro dialogue.
When you are done, save your work as a new MP3 file such as Movie-riff-muted.mp3. Do not overwrite the original Rifftrax audio file - you will still need it.
Prepare your files
At this point, you should have several files:
Movie.mkv- The original ripped movie, currently containing the video stream, stock audio stream, and anything else (such as subtitles) that was part of your ripped versionMovie.ac3orMovie.dts- The original movie audio track in AC3 or DTS (not DTS-HD) formatMovie-riff.mp3- The MP3 RiffTrax purchased from the siteMovie-riff-muted.mp3- The Rifftrax track with the robot voice and intro dialogue silencedMovie-riff.txt- The synchroniziation timestamp guide obtained with the RiffTrax file when you purchased it from the site
With these files prepared, we proceed with the integration.
Synchronize the RiffTrax with the movie audio
The Riff audio has a few minutes of introductory dialogue before the movie playback starts. To align it with the movie audio, we clip off the beginning with the sox tool. Start by looking in the README file for the timestaps of the Rifftrax audio and movie audio. Take the difference (that is, if 0:13 in the movie is 2:47 in the RiffTrax, the difference is 2:34) and run the following command, using the original RiffTrax audio with the disembaudio synch lines:
sox Movie-riff.mp3 Movie-riff-aligned.mp3 trim 2:34
It may take a few iterations to find the exact delay. Once you’ve merged this track with the movie audio in a few steps, listen to several of the Disembaudio lines and see if they’re properly aligned. If most of them are, you’re done. If not, tweak the trim value and try again - if Disembaudio comes in too early, try trimming a bit less (such as 2:33.5). If Disembaudio comes in too late, try trimming a bit more. Once you’re happy with the synchronization, do the process one more time. Use the trim value you settled on with the muted audio so that you never have to hear the Disembaudio voice again.
Convert the Rifftrax audio to Surround Sound
If you’re using a surround sound track for your movie, you’ll want to match the channels for your Rifftrax audio to the channels in the movie. You can do this with the following command:
ffmpeg -i Movie-riff-aligned.mp3 -filter_complex "[0:a]pan=5.1|FL=FC|FR=FC|LFE=FC[a]" -map "[a]" -c:a ac3 Movie-riff.ac3
This will put the RiffTrax left/right channels in your front left/right speakers. You could tweak the channel mapping if you’d like - to put the Rifftrax in the center channel, for instance - but this has worked well for me in practice.
Cross the Streams
To combine the original audio with the Rifftrax audio, use the following command:
ffmpeg -i Movie.ac3 -i Movie-riff.ac3 -filter_complex "[0:a]volume=0.75,amix=inputs=2:duration=longest" -b:a 640k Movie-combined.ac3
The volume=0.75 argument lowers the movie volume to 75% of its original intensity to ensure the Rifftrax is always audible. The right value depends on the movie. I recommend checking the combined track at a number of points to ensure the commentary is neither too loud nor too quiet and adjusting the value accordingly.
You can now listen to the Movie-combined.ac3 file to ensure that the volume levels and synchronization are correct. If either needs adjusting, repeat the steps above until you have your final combined track.
Add the track to the video
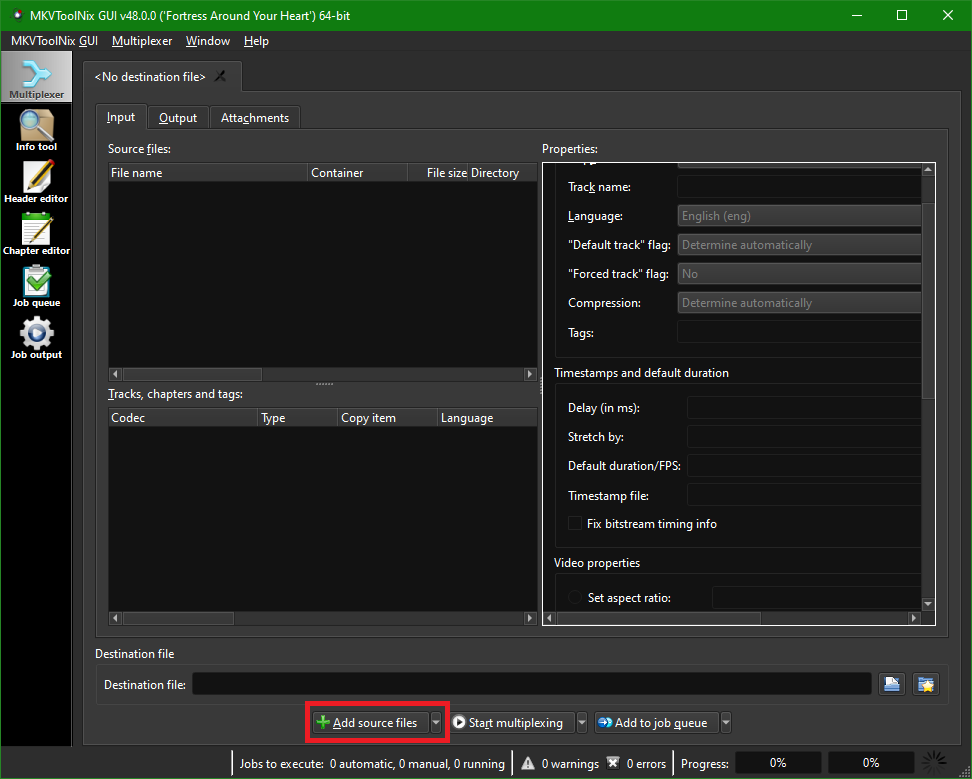
The simplest way to add the track to the MKV file is with the MKVToolNix GUI. Begin by clicking the “Add Source Files” button:

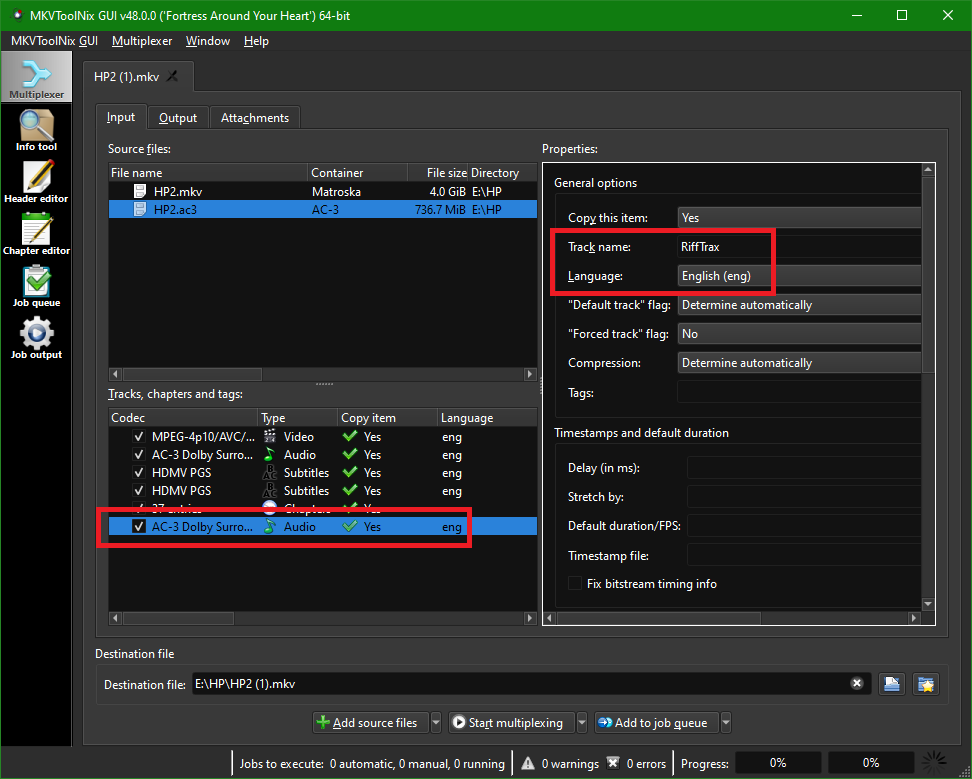
Add the MKV file containing the movie followed by the merged audio track. The audio track will appear at the bottom of the Tracks, chapters, and tags section. Click it and fill in a Track name (such as “RiffTrax”) and Language.

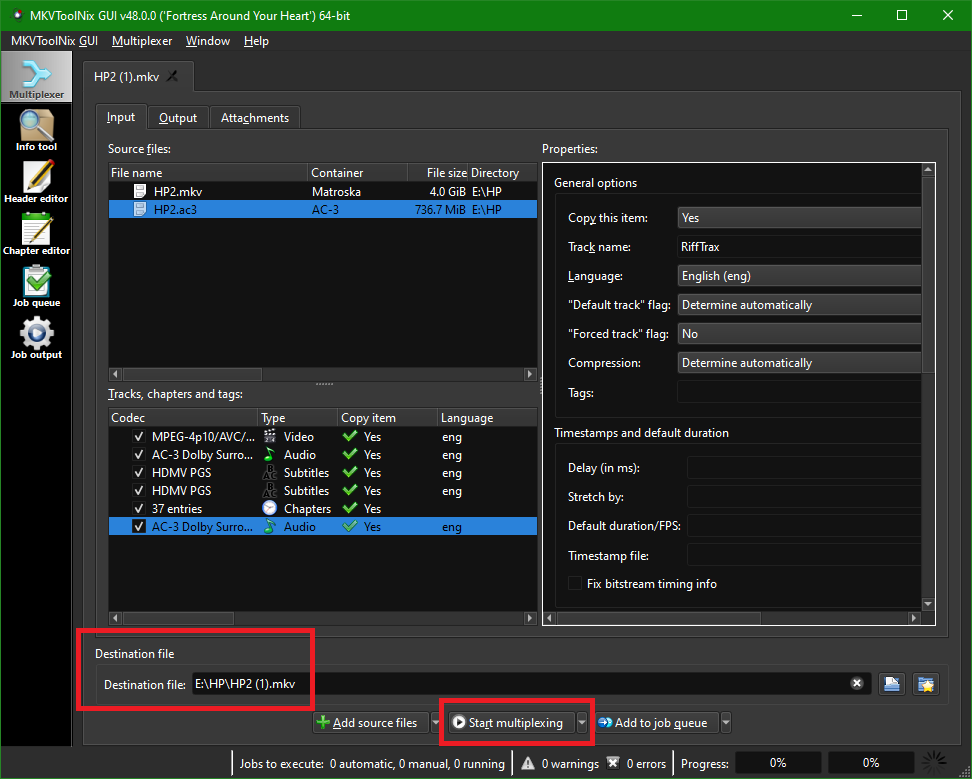
Provide a name for the merged file and click “Start multiplexing”.

Enjoy the output
You should now have a video file with multiple audio tracks. You can select the original movie audio or the Rifftrax audio depending on what you’re in the mood for.